First page . . . Back to page 3 . . . Forward to page 5 . . . Last page (page 6)
2×2×4
This puzzle is fairly easy to make with the parts from two Rubik's type 2×2×2 cubes. Here is my 2×2×4:
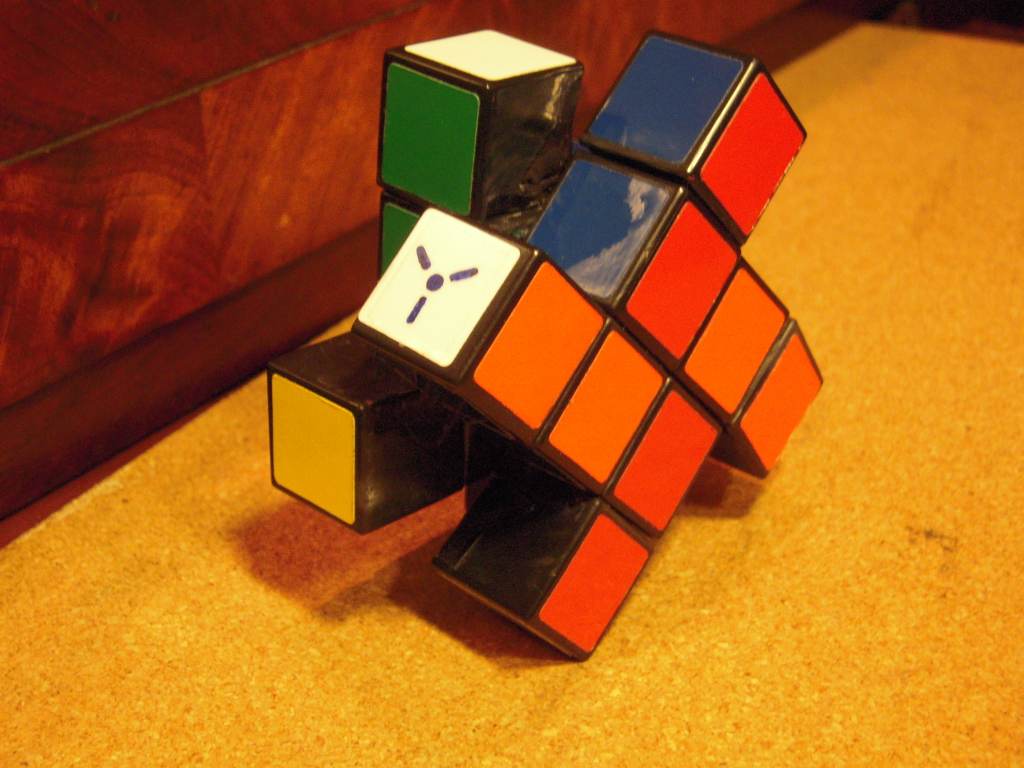
A 2×2×4 in a shapeshifted pretty-pattern
This video shows how to make your own 2×2×4 out of two standard 2×2×2's, and this video shows one being disassembled; here is another demonstrating the contrast between loose and well-aligned outer cubies. This video shows one being solved. Tony Fisher's model is built to a larger scale using a completely different design (probably a bandage-glued 4×4×4 core); this video shows him solving it.
This is the smallest size puzzle that can shape-shift. Shape-shifting occurs when turns make a puzzle change into different shapes, and when one or more of these different shapes persist through two or more consecutive turns.
Any "cuboid" puzzle can shapeshift if all three dimensions are at least two cubes long/wide/high, and there are two dimensions that differ by an even number1. This makes the 2×2×4 the smallest puzzle that shape-shifts.
In addition, because all of its dimensions are even, the puzzle is three-axis shape-shifting — it can turn 90o on all three axes even when it is in a non-cuboid shape. If either of the two long sides is turned just 90o, the two central layers still behave like a 2×2×2 and can be scrambled further.
In general, the "extra layers" cannot turn when the puzzle is in a non-cuboid shape, but the "central layers" always can. (There are minor exceptions to this, like the center cubies on a 3×3×5.)
Like all three-axis shape-shiting cuboids, the 2×2×4 can be scrambled in three different ways: by permuting the pieces, by shape-shifting, and by a combination of the two. Here, each photo also shows that the central 8 cubies of the 2×2×4 are scrambled the same way as a 2×2×2:
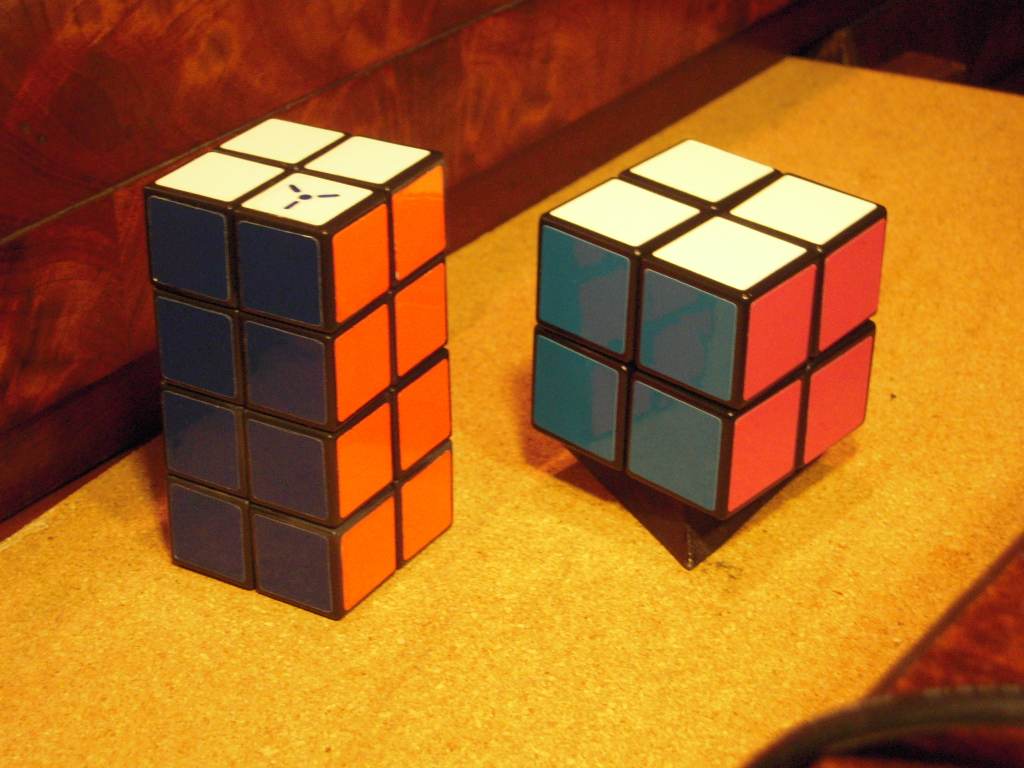 solved | 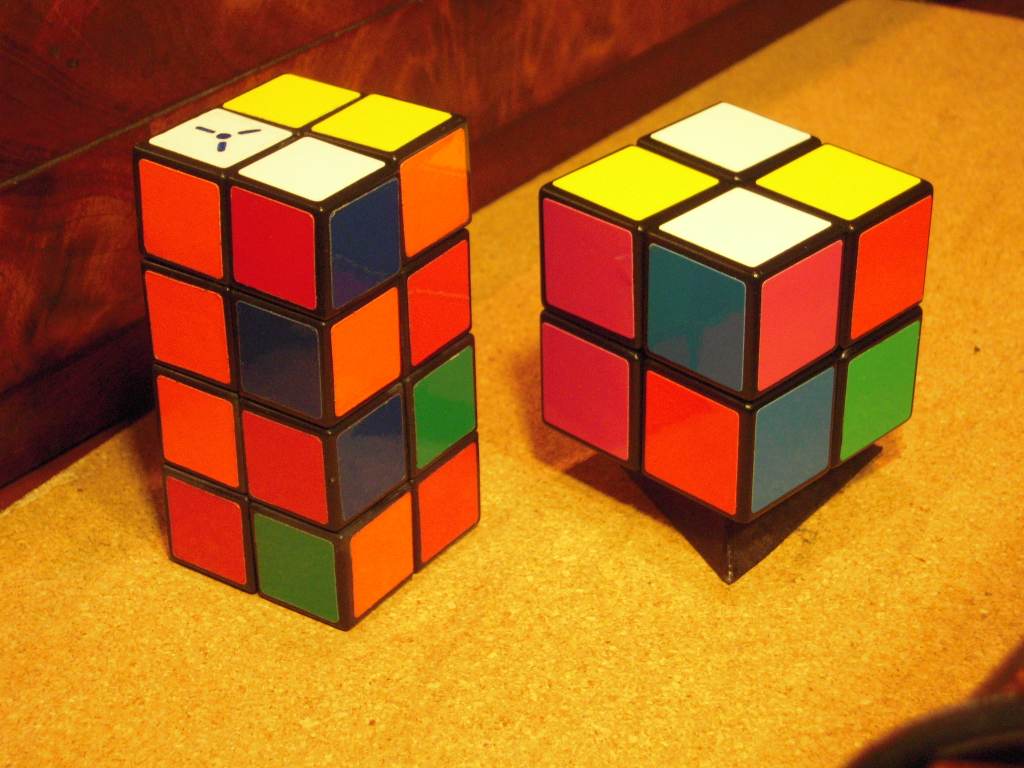 permuted |
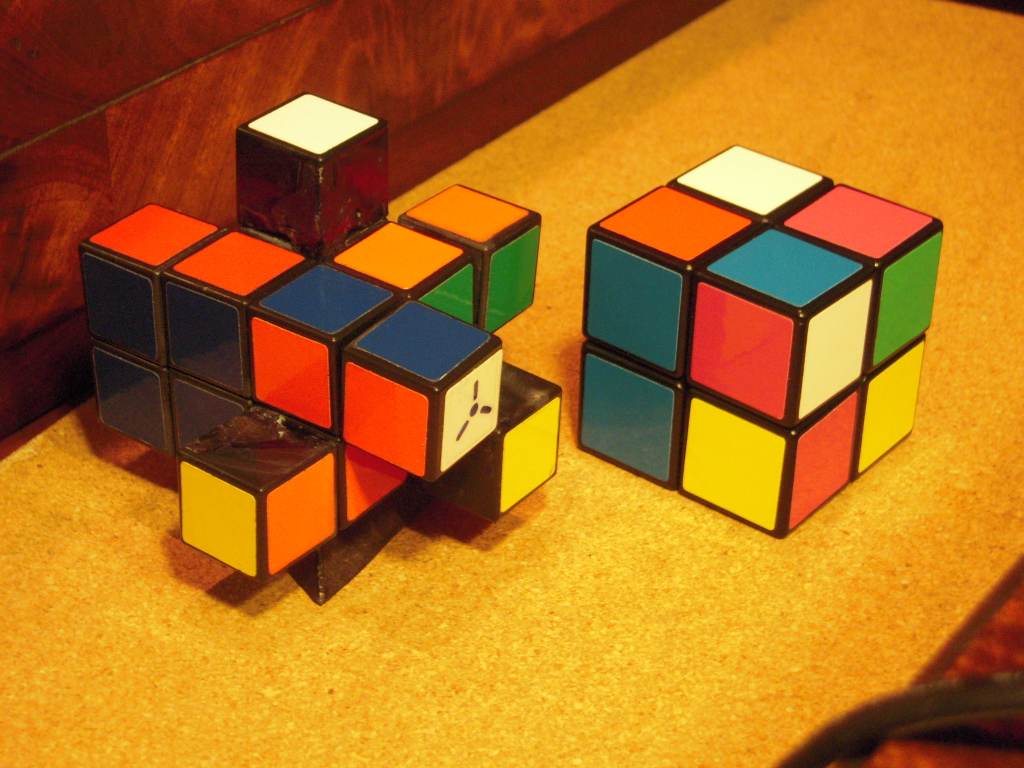 shapeshifted | 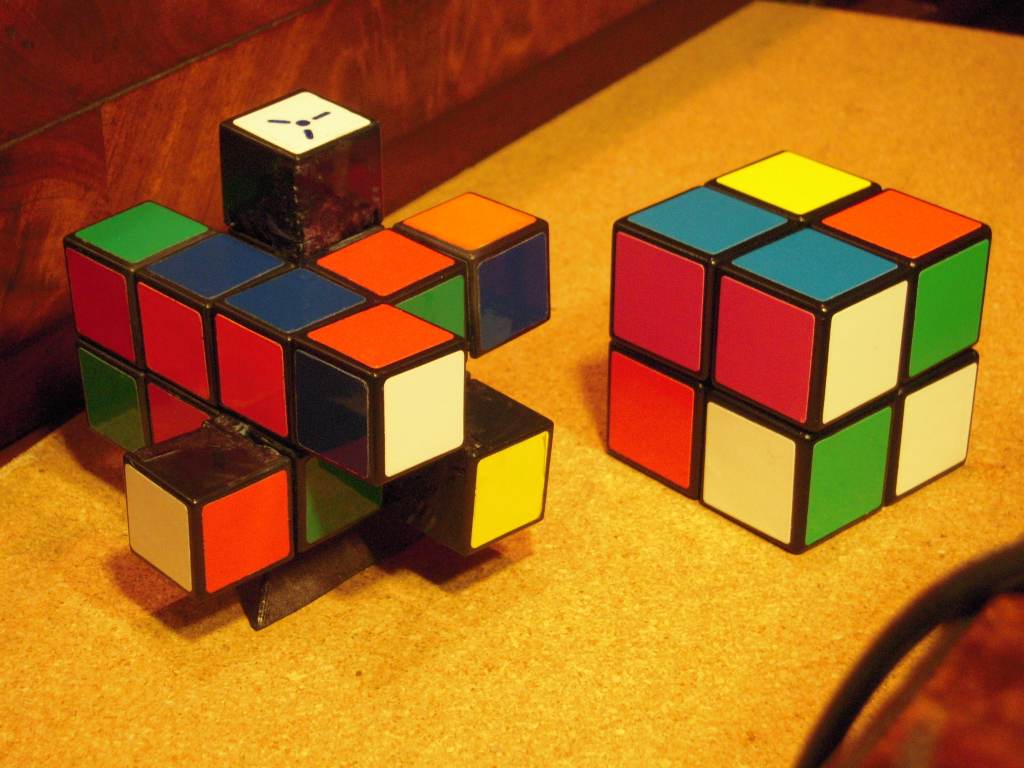 both |
Number of Combinations: The 1st and 4th layers of cubies can be treated like the corners (the 1st and 3rd layers) of a 2×2×3, and therefore have the same number of combinations, which is 8!=40320. These cubies behave like extensions of the central two layers, which work like a 2×2×2 — this is clear in the videos showing how the mechanism works.
Regardless of how you have scrambled the outer two layers, you can then proceed to create any combination of the central two layers. Those combinations that involve twisting the corners on a 2×2×2 create shapeshifted positions of the 2×2×4. The "inner 2×2×2" has its U and D faces covered by the extended layers, which means we can treat these two faces as if they are painted black. Such a "5-color 2×2×2" turns out to have the same number of combinations as the regular 2×2×2, because all eight pieces are still distinguishable even when U and D are made the same color.
Therefore, the total number of combinations of the 2×2×4 is 40320 for the outer 2 layers times the number of combinations of a 2×2×2, (which is 3674160, see above) giving 8! × 7!×36 = 40320×3674160 = 148142131200 ≈ 1.48×10¹¹.
Solution: As with almost all shapeshifting puzzles (even non-cuboid slicings like the Square 1), the solution technique for the 2×2×4 starts by getting it into a rectangular shape.
1. Work out the color order for L, F, R and B faces. Look on the ends of the extended cubes; this shows the two colors that belong on the U and D faces. Every piece has two other colors on it; these are the L, F, R and B colors. No cube has both the L and R colors, and no cube has both the F and B colors. After discovering which colors appear together on a face, you can select an order for (L, F, R, B) that satisfies this criterion. Any order will work, it doesn't matter what you pick. This will also determine which of the U and D colors is which.
2. Get the puzzle into a rectangular shape. This is like solving the orientation (only) of a 2×2×2. The shape of the puzzle shows how the 2×2×2's corners are twisted. Using L'D' LD' L'D2 LD2, the three central cubes at positions BLD, RBD, and FRD will get twisted counter-clockwise into DBL, DRB, and DFR respectively. This moves an extra cube from e:FRD to e:DFR and similarly with two others from e:BLD and e:RBD. Combinations of this move can get all the corners oriented.
Some do this step by just turning the puzzle this way and that until the puzzle turns into a familiar shape and solving the shape from there. The number of possible shapes is small enough that this method can become very efficient after some time spent learning each common shape and how to solve it.
3. Fix the positions of the central two layers. This is equivalent to the solution of the permute-only 2×2×2, but substituting U2 for U and D2 for D in all algorithms. In addition to the numerous algorithms I list there, you can use any 2×2×2 algorithms that move corners without changing their orientation with respect to U and D.
Note that as with a 2×2×2 there is no fixed orientation — either choice of U and D is possible, as is any choice of the remaining four colors for F. Once these choices are made, L R and B are fixed. So the important thing to remember about the colors is which order they go in; to determine this you need to look at the extended cubies as described in step 1.
4. Once the central 2×2×2 is solved, treat the puzzle as if it has its central two layers bandaged to emulate a 2×2×3. Then solve it like a 2×2×3 (two methods are described above), remembering to always turn the central two layers together.
5. You may be left with a single pair of edges that need to be swapped. This is called a dedge flip, and is a common parity error on the 4×4×4; the 2×2×4 is the smallest puzzle that has dedges (although the position and its solution is equivalent to two swapped corners on the permute-only-2×2×2). To swap the two edge pieces in the FR position, use U2 R2 U2 F2 U22 R2 U2 R2 D22 F2 U2' R2 D2 (13s)
2×2×5
Here is a video of a working 2×2×5 and here is another.
The 2×2×5 is significantly harder to build than the 2×2×3 or 2×2×4. One cannot simply use the 2×2×4 building technique to extend a 2×2×3, because the extended pieces would not stay in their tracks when the puzzle is turned partway on one of the two long axes. The most practical solution to this is to make the "feet" on the extended (corner) pieces long enough to extend most of the way through the adjacent edge pieces — far enough so the bottom of the "foot" is less than one cubie's height from the midplane of the puzzle.
Number of Combinations: The 1st and 5th layers of cubies can be treated like the corners (the 1st and 3rd layers) of a 2×2×3, and therefore have the same number of combinations, which is 8!=40320. To get them into any desired combination, just treat your 2×2×5 as if the middle three layers are bandaged together so it works like a 2×2×3.
Regardless of how you have scrambled the outer two layers, you can then proceed to create any combination of the central three layers. Here you would pretend that the 1st and 5th layers are bandaged to the 2nd and 4th layers respectively. The central three layers have the same number of combinations as a 2×2×3, which is 8!×6=241920, so the total number of combinations for the 2×2×5 is 241920×40320 = 9754214400 ≈ 9.75×10⁹.
Solution: To solve the 2×2×5, we will reduce the puzzle to a 2×2×3 pattern.
1. Match the 1st and 5th layer pieces with the 2nd and 4th layers. The algorithms to use here are the same as those from the first two steps of method 2 in my 2×2×3 discussion above. Treat the 2nd and 4th layer pieces as if they are "solved" and use the algorithms to move the 1st and 5th layer pieces around.
2. Now pretend that the 1st and 5th layers are bandaged to the 2nd and 4th layers respectively, and solve the rest of the puzzle like a 2×2×3 (using any 2×2×3 solving technique).
Alternate Solution: You may prefer to do the puzzle by layers. The central layer should be done first to avoid a parity issue.
1. "Solve" the center layer. This is the same as the 1×2×2 — just keep turning R2 and F2 until it is solved.
2. Solve the pieces in the 2nd and 4th layers using the corner movement algorithms from the 2×2×3. Use the central layer as a reference to determine which piece goes where.
3. Solve the pieces in the 1st and 5th layers using the corner movement algorithms from the 2×2×3.
2×2×6
Here is a video of Tony Fisher's 2×2×6 in action.
A 2×2×6 has also been made from two normal 4×4×4 cubes, glueing cubies together in 1×2×2 blocks. The result is shown here.
2×2×7
See Tony Fisher's in action.
2×3×3
This shape is equivalent to the "Rubik's Domino" puzzle, and is just about as easy to build as the 2×2×3. Here is a video of a 2×3×3 in action. This video shows one being disassembled; the parts are all made from ordinary 3×3×3 Rubik's Cube parts.
Emulating this puzzle on a 3×3×3 requires blacking out the central layer, and remembering to keep that layer all black. A 4×4×4 can be bandaged to create a puzzle that works exactly like a 2×3×3:
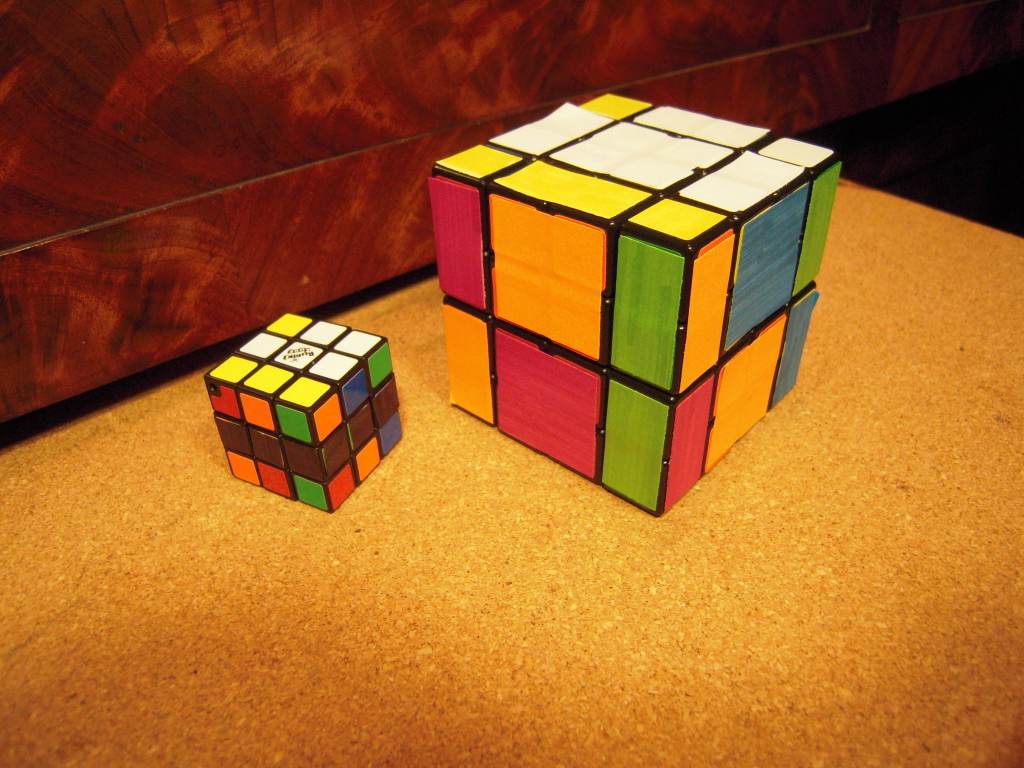
two ways to emulate a 2×3×3
This video shows a 3×3×3 that was scrambled, and is being solved, using only moves that would be valid on the 2×3×3: all U and D moves plus F2, B2, L2 and R2. According to the video's author, most of the solution was accomplished with the algorithm R2 D' R2 D R2 D' R2 D.
There are two centers, U and D, which turn but do not move. This is not enough to uniquely define the orientation of the puzzle, so instead, I choose to imagine that the DB edge piece is left stationary (or equivalently, is always considered solved). This limits moves to the set that does not move DB: [ U, F2, F22, L2, R2 ]. U performs an odd permutation of corners and an odd permutation of edges (even total). F2, L2 and R2 each perform an even permutation of corners and an odd permutation of edges (odd total). F22 performs an even permutation of edges, swaps the two centers and does not affect the corners. This combines to make all permutations possible with no parity restrictions (specific single-pair-swap algorithms are given below.) Orientation plays no role because all pieces are asymmetrical and their orientation is determined entirely by their position (except for the invisible rotation of the two centers). This makes the total number of combinations 8!×7!×2! = 40320×5040×2 = 406425600 ≈ 4.06×10⁸. (Alternately, if you consider the centers to be immobile, there are 8! combinations for the corners times 8! for the edges, and you divide by 4 because there are 4 ways to hold the puzzle without moving the centers, which gives 8!×8!/4 = 406425600.)
Solution: This solution is not particularly efficient, but it highlights the differences between the 2×3×3 and smaller cubes like the 1×2×3, 2×2×3, and 1×3×3, and gives algorithms to address each of these differences. Start by choosing one of the 3×3 sides to be the U side. Consider its center piece to be already solved.
1. Get at least 3 U corners onto the U face. I usually just do some random F2, R2, and U turns to accomplish this, but it doesn't hurt to know that:
1a. If there are two U corners on the U face and they are next to each other, you can turn U until they are at ULF and ULB, then turn D to put at least one of the U corners at DRF or DRB, and then do R2.
1b. Similarly, if there are two U corners on the D face and they are next to each other, you can turn D until they are at DRF and DRB, then turn U to put at least one of the other U corners at ULF or ULB, and then do R2.
1c. If the U and D faces both have two U corners on diagonally opposite corners, turn U and D to put all the U corners in the FR and LB corners, then do R2U'R2.
2. Match up the corners in pairs. Start by turning U until there is at least one corner in the U layer that is matched up with its counterpart in the D layer. (Often two adjacent corners can be matched at once). To get the rest paired up, use the following algorithms:
2a. To swap URF and ULF corners, do L2F2 U'R2 UR2 U'R2 UL2U' (11f)
2b. The 3-cycle (ULF → URF → DRF) is accomplished by U F2 U L2 U' L2 U L2 U2 (9f)
3. Match up the edges in pairs.
3a. Most of the time there is just one edge paired up. One or two more can be matched with the following algorithm that cycles (UL → UF → UR): R2 U' R2 U F22 U' R2 U F22 R2 (10s). Combine this with any of the turns L2, F2, R2 or B2 to switch an upper edge with a lower edge.
3b. If you are left with exactly two pairs of edges that are still unmatched, you need a way to swap a single pair of edges:
To swap UF and UR, use F22 U F2 U2 L2 F2 U2 F2 L2 U F22 (11s).
To swap UL and UR, use U2 F2 U2 F2 U2 F2 (6f).
4. Now that all the edges and corners are in matched pairs, get as much of it solved as possibe using the method for the 1×3×3 (see above). You will be able to get all four corner-pairs in place and all but one edge-pair oriented properly:
4a. Look at the corners to determine which order the L, F, R, and B colors go in (when the corners are oriented properly it is more obvious).
4b. Position the corner-pairs without trying to get them oriented.
4c. Orient as many edge-pairs as possible without trying to get them positioned.
5. There are three remaining "parity" cases that can occur. These represent positions that cannot be achieved on a 1×3×3:
5a. Moving edge-pairs. To exchange the UL-DL edge pair with the UR-DR pair, use U2 F22 U2 F22 (4s). To exchange the UF-DF edge pair with the UR-DR pair, use R2 U F22 U' R2 F2 U F22 U' F2 (10s).
5b. Flip over a single pair of corners. To exchange the URF and DRF corners, use U F122 U' F2 U' F2 U F22 L2 U' F2 U L2 U' L2 (16s).
5c. Flip over a single pair of edges. To exchange the UF and DF edges, do U2 F2 L2 U2 L2 F2 U2 L2 (8f)
5d. Combinations: To flip over all three pairs on the front face, do L2 U R2 U' L2 F2 L2 U R2 U' L2 (11f)
2×3×4
Tony Fisher has built one, with video here and photos here and here.
Garrett Ong made another design, available from ShapeWays (though for much more than the original $50)
2×4×4
This video shows a 2×4×4 that is built more or less like a sliced Eastsheen 4×4×4.
2x5x5
Ola Jansson made the first 2x5x5 design in 2010; photos of one that was 3D-printed byKarl-Heinz Diekmann are here.
First page . . . Back to page 3 . . . Forward to page 5 . . . Last page (page 6)
 s.27
s.27