Slide Rules
Contents
Slide Rules I Designed and Made
My Own Slide Rules
I am obsessed with large numbers, and as a child I was developing this keen interest just at the time when slide rules were beginning to become obsolete (and were therefore cheap) but calculators were still out of my price range. As a result I developed my own slide rules to overcome the limitations of normal rules.
Model 1

Munafo "Model 1"
I made this at age 14, it is a simplex with 4 nonstandard scales used to calculate the iterated exponential function z=(...((xx)x)...)x = xx(y-1) (also called the "lower hyper4 operator"). The instructions are written on the slide between the C+1 and L scales, they read:
Z = X*Y 1. Place 2 on Z1 scale over y on C+1 scale. Below x on Z1 scale read q on C+1 scale. 2. Place 1 on L scale over x on LL scale. Below q on L scale read z on LL scale.
The L scale is linear going from 1 to 11. If the slide and stock are aligned and the value on the L scale is x, then the values on the other three scales can be calculated as follows:
Z1 scale: 102x-10
C+1 scale: 1+2x-K1 where K1 = 1+1/log(2)
LL scale: 22x-K2 where K2=1+log(log(210))/log(2)
The Z1 and LL scales are equivalent, they are just horizontally offset. The LL scale determines the range of values of z that can be calculated and runs from 100.1= 1.26 up to 10100. I'm not sure why I developed such an indirect way to calculate the function, but my goals were to avoid the use of a cursor and to avoid the need to subtract 1 from y. The scales are not particularly accurate but I was mainly interested in just proving that it could work.
Around the time of the Model 3 I created a nomogram to compute the lower hyper4 operator in a single step. One of its scales is curved, the other two straight.
Model 3
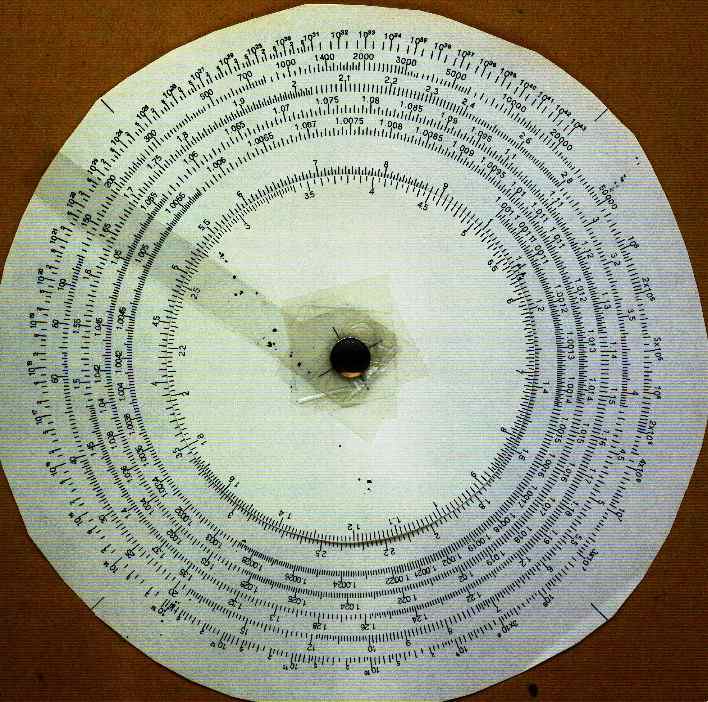
Munafo "Model 3"
My continued interest in large numbers and nostalgia over my early slide rule attempts led in the early 1990's to this circular rule with a spiral LL scale, produced on a 300-DPI laser printer by a program I wrote myself. My coworkers were quite amused that I had used so much computational power to create an obsolete computing instrument.
All the slide rules I had seen had LL scales that only go up to e10=22026, or a slightly higher limit like 30000 or 100000. I was dissatisfied with this limited range, I wanted to calculate much larger exponents. (The Pickett models 2, 4, and 14 have LL4 scales going up to 1010, but I didn't know this and it still wouldn't have been high enough to satisfy me). This limited range concerned me, and I was also concerned with accuracy. Circular rules offer the potential for greater accuracy by having a greater effective scale length. I realized that the LL scales worked much better if they were joined together into a single continuous scale and on a circular slide rule this scale can be made as a spiral. It is by far the most direct and natural way to implement the LL scale, but apparently it is not obvious. As far as I know, only one commercial slide rule was ever made that uses this idea of a true continuous spiral LL scale — the Fearns, which has an LL scale going from 1.01 to 106, about 3.1 revolutions.
My circular rule has only 3 scales: C, D and a spiral LL scale going from e0.001=1.001 all the way up to e100=2.7×1043. The scale length of the LL scale is about 78 inches, or 2 meters. This completely covers the range of all LL scales on commercial slide rules — most of the better ones have 4 LL scales going from 1.001 to 22000 or from 1.0023 to 1010.
As pictured it is set up to calculate 727=6.6×10²². The number 1 on the C scale has been aligned with 7 on the LL scale, the cursor is aligned with 2.7 and shows the answer. The cursor has no hairline, you're supposed to use the right-hand edge of the cursor as a hairline. Some flaws in the software used to generate the LL scale are evident: 1.00105 and 1.0105 are mislabeled "1.0011" and "1.011" respectively; the number of subdivisions changes at odd places (for example, at 1.48 rather than at 1.45 or at 1.5); some odd numbers were chosen to get labels (like 1400 instead of 1500).
Notes on Slide Rule Design
Here is a general discussion of design for convenience and accuracy including much that I have not seen elsewhere.
History
A brief overview of slide rule history is useful at this point.
Slide rules go back hundreds of years, with new designs keeping almost all elements of a previous popular design to make it easier for people to adjust to the new rule.
The physical form of the slide rule was developed by William Oughtred in 1630 (two logarithmic scales placed side by side to perform multiplication), Seth Partridge (a body or "stock" that holds a slide, making it easier to keep the two pieces together) and John Robertson (the cursor, making it possible to use more than 4 scales and align values from one scale onto another).
The oldest surviving element of the scale names and layout is the set of 4 scales A, B, C, D arranged from top to bottom in that order. This was Mannheim's design around 1855, these scales still appear in the same order and placement on almost all slide rules today. Multiplying with A and B is most convenient because it avoids falling off the end of the scale, a problem discussed below. However, the C and D scales are used more often because they provide greater accuracy. Having all 4 scales makes it possible to take square roots, and allows quickly multiplying something by the square of something else with a single setting, as when computing the area of a circle (a = pi r2: Place 1 on C against r on D; against pi on B read a on A).
Other scales were added later to make other calculations possible, most notably the L scale to take logarithms and antilogarithms (which allows calculating any value of the form xy, yth root of x and logxy) and trig scales (the most common are S, T and ST). Rules in this category include the "modern Mannheim" (A[B.CI.C]D.K, [S.L.T]) and "Rietz" (K.A[B.CI.C]D.L, [S.ST.T]) arrangements.
Modern general-purpose duplex slide rules have lots of extra scales just for convenience. For example, the LL scales allow directly calculating xy in one step, rather than three steps needed with a Rietz (take log of a, multiply by b, take antilog). This is important for financial calculations related to interest, principal, present value, etc.
CI against D Multiplication
CI against D Multiplication is the technique of using the CI and D scales to multiply. It avoids the common inconvenience of needing to guess in advance whether the product will be greater than 10. The reason it works is because of the rotational symmetry introduced by having one scale reversed.
C against D Multiplication
Almost all slide rules have C and D scales placed against each other along the lower edge of the slide:
1 2 3 4 5 7 10 C |________:_____|________|_____|____|___:__|__:__:_| D | : | | | | : | : : | 1 2 3 4 5 7 10Notice I labeled the right end "10", usually it says "1". There's a reason I used "10" which I'll explain later.
To find z = x × y, place 1 on C against x on D, then against y on C read z on D
1 2 3 4 5 7 10 C |________:_____|________|_____|____|___:__|__:__:_| D | : | | | | : | : : | 1 2 3 4 5 7 10Example: multiplying 2 times 3. Place 1 on C against 2 on D; against 3 on C read Z (6) on D.
The inconvenience arises because, when the answer is greater than 10 you have to position the scales a different way: place 10 on C against x on D, then against y on C read z/10 on D.
1 2 3 4 5 7 10 C |________:_____|________|_____|____|___:__|__:__:_| D | : | | | | : | : : | 1 2 3 4 5 7 10Example: multiplying 5 times 3. Place 10 on C against 5 on D; against 3 on C read Z/10 (1.5) on D.
Now you see why I label the right end of the scale "10" instead of "1". It helps you remember when to add a decimal point. The rule is: If you set the multiplicand against the 10 index, multiply your answer by a factor of 10.
After a while you can usually figure out in advance which way to do it: if the answer will clearly be bigger than 10, you know to use the second method. However, sometimes (like when multiplying 2.7 by 3.7) it is not so easy to figure out in your head whether the answer will be bigger than 10.
CI against D Multiplication
The inconvenience is avoided entirely if you use the CI scale against the D scale:
<10 <7 <5 <4 <3 <2 <1 CI |_:__:__|__:___|____|_____|________|_____:________| D | : | | | | : | : : | 1 2 3 4 5 7 10Notice the symmetry of this diagram: If you turned it upside down, it would still be the same (except for the numbers and letters). It is because of this symmetry that the rule for multiplying becomes simpler:
To find z = x × y, Place x on CI against y on D (or vice versa). Against 1 on CI (or D) read z on D (or CI); or against 10 on CI (or D) read z/10 on D (or CI).
<10 <7 <5 <4 <3 <2 <1 CI |_:__:__|__:___|____|_____|________|_____:________| D | : | | | | : | : : | 1 2 3 4 5 7 10Example: multiplying 2 times 3. Place 2 on CI against 3 on D (or 3 on CI against 2 on D); against 1 on CI read z (6) on D (or, against 1 on D read z on CI).
<10 <7 <5 <4 <3 <2 <1 CI |_:__:__|__:___|____|_____|________|_____:________| D | : | | | | : | : : | 1 2 3 4 5 7 10Example: multiplying 5 times 3. Place 5 on CI against 3 on D (or 3 on CI against 5 on D); against 10 on CI read z/10 (1.5) on D (or, against 10 on D read z/10 on CI).
Note that in these examples, it doesn't matter which scale is used for x and which for y, the same placement aligns both. Also, the answer can be read on either scale. This elegance and the convenience of not having to use a different setting for answers greater than 10 result from the rotational symmetry of the CI and D configuration: if you turn it over, it's the same (the D scale becomes a CI and the CI becomes a D).
Split Square-Root Scales
Some slide rules (including the Faber-Castell 2/83N Novo Duplex) have two pairs of double-length scales that each cover half the range from 1 to 10. In the 2/83N they are called W1, W1', W2 and W2'. These are used together to perform multiplication with greater accuracy (because a longer scale makes it easier to align the numbers and read the answer). They are placed on the reverse side of the duplex rule in the positions normally taken by the A B C and D scales on a Mannheim. Here is a representation of the reverse side of the 2/83N:
1 1.5 2 3 r W2 |___.___.___.__.__:__.__._._._|___.___.___.__.__|_' W2' | ' ' ' ' : ' ' ' ' | ' ' ' ' | . 1 1.5 2 3 r r 4 5 6 7 8 9 10 W1' '___:_____|____:____|___:___|___:__|__:__|__:_|_:_| W1 . : | : | : | : | : | : | : | r 4 5 6 7 8 9 10The index marks r are the square root of 10.
To multiply z = x × y: Place 1 or 10 on W2'/W1' against x on W2/W1; against y on W1'/W2' read z on W1/W2 (or read z/10 if 10 was placed against x). If that places y off-scale then instead place r on W1'/W2' against x on W1/W2; opposite y on W1'/W2' read z on W2/W1 (or read z/10 if y is greater than r). Always follow the rule that if x is set against 1 or 10, the answer is read on the scale directly adjacent to y, and if x is set against r, the answer is read from y to the opposite W scale using the cursor.
Here are 4 examples using a setting of the left index mark to x:
1 1.5 2 3 r W2 |___.___.___.__.__:__.__._._._|___.___.___.__.__|_' W2' | ' ' ' ' : ' ' ' ' | ' ' ' ' | . 1 1.5 2 3 r r 4 5 6 7 8 9 10 W1' '___:_____|____:____|___:___|___:__|__:__|__:_|_:_| W1 . : | : | : | : | : | : | : | r 4 5 6 7 8 9 10Example 1: multiplying 1.5 times 2. Place 1 on W2' against 1.5 on W2; against 2 on W2' read z (3) on W2.
Example 2: multiplying 1.5 times 4. Place 1 on W2' against 1.5 on W2; against 4 on W1' read z (6) on W1.
1 1.5 2 3 r W2 |___.___.___.__.__:__.__._._._|___.___.___.__.__|_' W2' | ' ' ' ' : ' ' ' ' | ' ' ' ' | . 1 1.5 2 3 r r 4 5 6 7 8 9 10 W1' '___:_____|____:____|___:___|___:__|__:__|__:_|_:_| W1 . : | : | : | : | : | : | : | r 4 5 6 7 8 9 10In these two we read the answer with the cursor ("opposite" rather than "against" the multiplier)
Example 3: multiplying 5 times 1.5. Place r on W1' against 5 on W1; opposite 1.5 on W2' read z (7.5) on W1.
Example 4: multiplying 5 times 4. Place r on W1' against 5 on W1; opposite 4 on W1' read z/10 (2) on W2.
Half the time you need to set a right index mark to x. Here are 4 more examples:
1 1.5 2 3 r W2 |___.___.___.__.__:__.__._._._|___.___.___.__.__|_' W2' | ' ' ' ' : ' ' ' ' | ' ' ' ' | . 1 1.5 2 3 r r 4 5 6 7 8 9 10 W1' '___:_____|____:____|___:___|___:__|__:__|__:_|_:_| W1 . : | : | : | : | : | : | : | r 4 5 6 7 8 9 10(Note: in these two examples the illustration fails to show correct alignment with the 8.)
Example 5: multiplying 8 times 1.5. Place 10 on W1' against 8 on W1; against 1.5 on W2' read z/10 (1.2) on W2.
Example 6: multiplying 8 times 5. Place 10 on W1' against 8 on W1; against 5 on W1' read z/10 (4) on W1.
1 1.5 2 3 r W2 |___.___.___.__.__:__.__._._._|___.___.___.__.__|_' W2' | ' ' ' ' : ' ' ' ' | ' ' ' ' | . 1 1.5 2 3 r r 4 5 6 7 8 9 10 W1' '___:_____|____:____|___:___|___:__|__:__|__:_|_:_| W1 . : | : | : | : | : | : | : | r 4 5 6 7 8 9 10And another two cases using the cursor to read the answer:
Example 7: multiplying 2 times 6. Place r on W2' against 2 on W2; opposite 6 on W1' read z/10 (1.2) on W2.
Example 8: multiplying 2 times 2. Place r on W2' against 2 on W2; opposite 2 on W2' read z (4) on W1.
Reversed Split Square-Root Scales
As you can see, using the W1-W2 scales has two inconveniences — the need to guess which index mark to start with (a problem familiar in ordinary C-against-D multiplication) and (50% of the time) the need to use the cursor to read the answer on the opposite scale from y.
The first of these inconveniences can be eliminated by reversing the placement and orientation of the two scales on the slide (or, just by removing the slide and putting it back in upside down):
1 1.5 2 3 r W2 |___.___.___.__.__:__.__._._._|___.___.___.__.__|_' W1 | : | : | : | : | : | : | : . <10 <9 <8 <7 <6 <5 <4 r r<3 <2 <1.5 <1 W2 '_|__.__.___.___.___|_._._.__.__:__.__.___.___.___| W1 . : | : | : | : | : | : | : | r 4 5 6 7 8 9 10Notice I have also simplified the scale names, because now there is a new symmetry and the instructions would be the same if all W1 and W2 were replaced with W1' and W2'.
With this scale layout the instructions for multiplication become: If x and y are both on W2, align x on one W2 with y on the other W2 using the cursor. Against either r read z on W1.
If x and y are both on W1, align x on one W1 with y on the other W1 using the cursor. Against either r read z/10 on W2.
If x is on W2 and y on W1 or vice-versa, place x against y. Against 1 read z, or against 10 read z/10.
Here are several examples:
1 1.5 2 3 r W2 |___.___.___.__.__:__.__._._._|___.___.___.__.__|_' W1 | : | : | : | : | : | : | : . <10 <9 <8 <7 <6 <5 <4 r r<3 <2 <1.5 <1 W2 '_|__.__.___.___.___|_._._.__.__:__.__.___.___.___| W1 . : | : | : | : | : | : | : | r 4 5 6 7 8 9 10Example 1: multiplying 1.5 times 2: both are on W2. Align 1.5 on W2 with 2 on W2 using the cursor; read z (3) on W1 against r on W2.
Example 2: Multiplying 5 times 6: both are on W1. Align 5 on W1 with 6 on W1 using the cursor; read z/10 (3) on W2 against r on W1.
1 1.5 2 3 r W2 |___.___.___.__.__:__.__._._._|___.___.___.__.__|_' W1 | : | : | : | : | : | : | : . <10 <9 <8 <7 <6 <5 <4 r r<3 <2 <1.5 <1 W2 '_|__.__.___.___.___|_._._.__.__:__.__.___.___.___| W1 . : | : | : | : | : | : | : | r 4 5 6 7 8 9 10Example 3: multiplying 1.5 times 4. Place 1.5 on W2 against 4 on W1; read z (6) on W1 against 1 on W2.
1 1.5 2 3 r W2 |___.___.___.__.__:__.__._._._|___.___.___.__.__|_' W1 | : | : | : | : | : | : | : . <10 <9 <8 <7 <6 <5 <4 r r<3 <2 <1.5 <1 W2 '_|__.__.___.___.___|_._._.__.__:__.__.___.___.___| W1 . : | : | : | : | : | : | : | r 4 5 6 7 8 9 10Example 4: multiplying 2 times 9. Place 2 on W2 against 9 on W1; read z/10 (1.8) on W2 against 10 on W1.
Example 5: multiplying 7 times 8. Align 7 on W1 with 8 on W1 using the cursor; read z/10 (5.6) on W1 against r on W2.
Notice in all these examples that both permutations of x and y occur simultaneously with the same slide position. In other words, multiplying x times y uses the same position as multiplying y times x. Also, the answer can always be read in two places: on the slide against an index mark on the stock, or on the stock against an index mark on the slide. As with CI-against-D method, these things result from the fact that there is greater symmetry in the new arrangement.
Acknowledgments
Bob Finch corrected my instructions for the original W1/W2/W1'/W2' method. Thanks also to the sliderule-trade mailing list for helping me figure out how to get the one rule I always wanted (a 5-inch log-log rule! Yeahy!) and how much I should pay.
Slide Rule Watches
I have a Timex Expedition Military T49825 quartz watch with two slide rule scales (the outer one rotating) with some special markers useful in calculations involving time, speed, and distance:
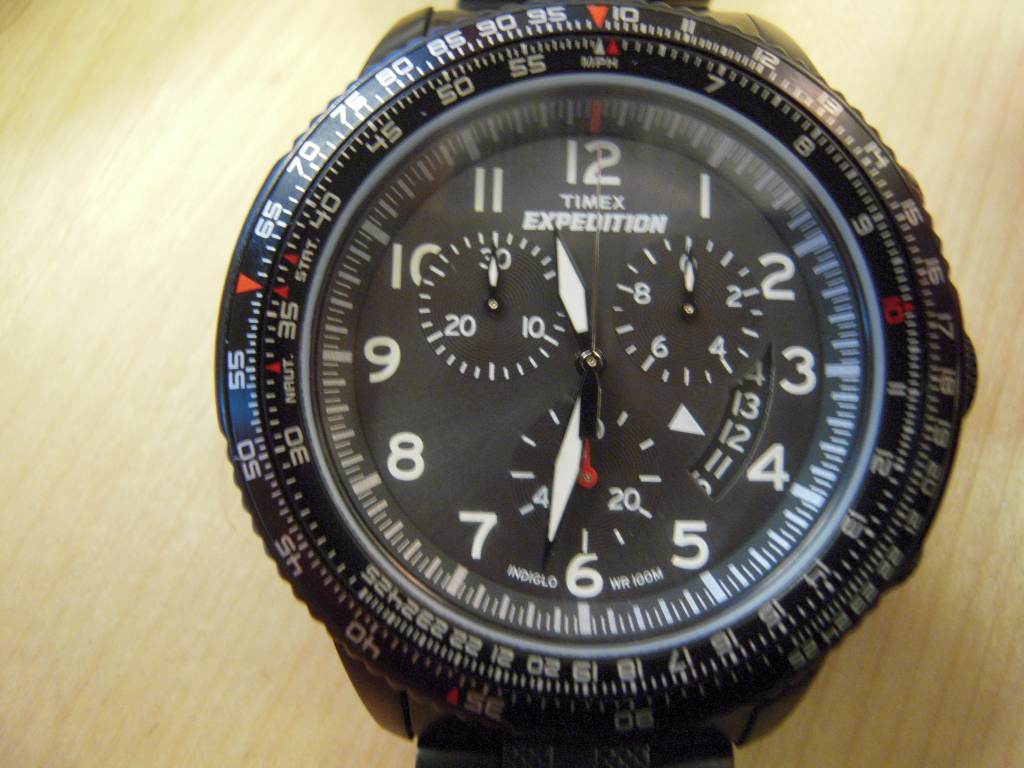
Timex Expedition Military T49825
Almost all watches like this are derived from the pilot's E-6B flight computer, notable for a prominent "rate" or "MPH" marker at 60 and several special marks for unit conversions. Most slide rule watches copy the design simplifications of Breitling designs, particularly their Navitimer which debuted in 1952.
There are two circular scales that increase in the clockwise direction (like C and D on a normal circular rule). The inner scale is usually used for units of time; in the Breitling design (and the E-6B before it) there is an additional scale fixed to this inner scale to aid in converting between base 60 and base 10: for example, a "1:10" under the "70" because 1 hour 10 minutes is 70 minutes; similarly "1:20" under the "80", "1:30" under the "90", all the way around to "9:00" under the 54 mark.
The outer scale has prominent red triangles at 10, 60 and 36, and the inner scale has "10" in red, a triangle at 36 and the label "MPH" at 60. These markers are all useful in time, speed and distance calculations that mix units of seconds, minutes and/or hours.
On the inner scale there are also red triangles at 33 marked "NAUT.", at 37.5 marked "STAT." and an unmarked red triangle at 61. These are used for conversion between miles and kilometers, because 33 nautical miles is 37.976 statute miles or 61.116 kilometers. (The Breitling places "STAT." at 38, which is much more accurate. On the pilot's E-6B and many watches that do not copy Breitling, these markers are at 66, 76 and 122, which produce the same ratios.)
In typical usage, I might measure how long it takes to travel one kilometer. Using the stopwatch, I measured 39.35 seconds (the large sweep second hand is on 39 seconds and the little hand near 2-o-clock shows the fraction 0.35):
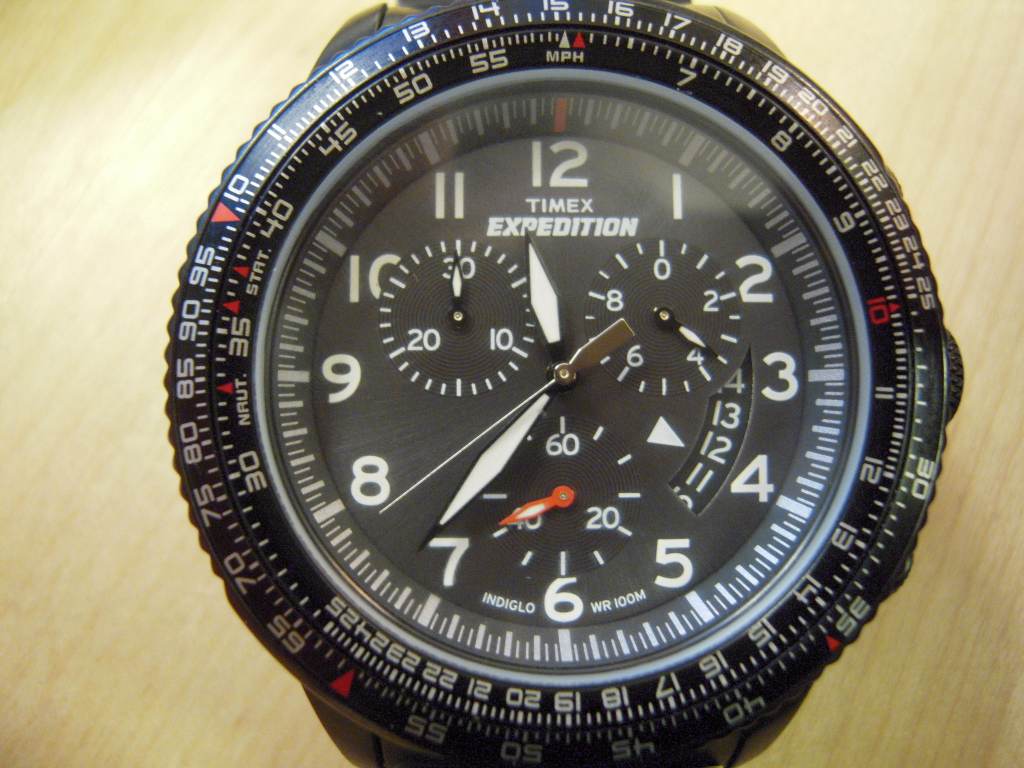
Speed Calculation: 1 km in 39.35 sec
In time and distance calculations I always use the outer dial for distance and the inner dial for time. My measurement was 1 kilometer and 39.35 seconds, so I'll treat the outer scale as being labeled in kilometers and the inner scale as being labeled in seconds. To calculate kilometers per hour, I have turned the outer scale until the red triangle at "10" (representing 1 km) is adjacent to 39.35 on the inner scale (representing 39.35 seconds). An hour is 3600 seconds, so to find the number of kilometers in an hour, I find 36 on the inner scale, and look where that is on the outer scale. We see it is approximately 92, so the speed is about 92 kilometers per hour. For kilometers per minute, you can look next to the 60 on the inner scale (ignoring the label "MPH", which we will get to in a moment) and see that it would be about 1.52 kilometers per minute.
Intended Applications
As I mentioned above, this design was originally marketed to pilots. The inner, non-rotating scale was meant to represent minutes, and was augmented with another inner scale giving the same amount in hours and minutes. This is why the "MPH" for miles per hour is at 60 on the inner scale.
Typically, a pilot would turn the outer dial until his Ground speed (measured in nautical miles per hour, and after correcting for wind) is lined up with the MPH marker. It is then easy to answer questions like:
- How long will it take to travel 270 nautical miles?
- How far will we travel in 4 hours 30 minutes?
Provided that you have set your speed in knots against the MPH marker, both of these are answered without turning the dial again: for the first answer, look for 270 on the outer dial and the answer (in minutes) is read from the inner dial; in the other example find 270 on the inner dial and the answer is read from the outer dial. Naturally, the same techniques work if you are using statute miles.
If you want to do similar calculations in kilometres, you just do the same thing and pretend that the "MPH" marker says "KMH". Turn the outer dial so that your speed in km/h is next to the MPH marker, and solve problems the same way, interpreting the numbers on the outer dial as kilometers. In this particular case, the equivalent speeds in miles per hour happen to be very close to the NAUT. and STAT. markers, because 60 km/hour is 32.397 knots or 37.282 statute miles per hour.
Errors
I got this watch mainly for the "nerd appeal" and not for serious use, but I do occasionally want to use the slide rule for real problems.
The inner and outer scales are the same and line up well when you position 1 on the outer scale to 1 on the inner scale. However, there are only 4 divisions between 75 and 80 (there should be 5). On closer inspection one finds that 60 and 70 are too close, while 80, 90 and 10 are too far. Because of this and other similar inaccuracies, the scales do not line up properly in other positions. Here it is positioned 1 (outer) to 2 (inner):
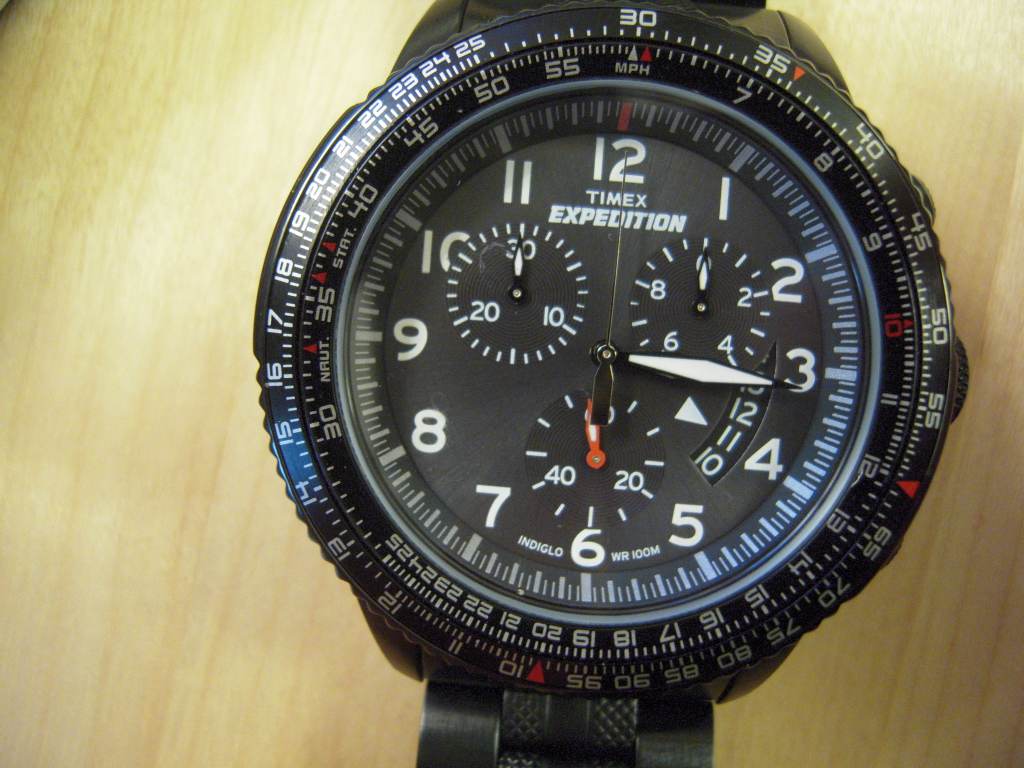
The T49825 aligned 1:2
Everything should be lined up in a 1 to 2 (or 5 to 1) ratio. 15 to 30 and 25 to 50 line up pretty well. But instead of 20 to 40 we have 20 to 39.7, and instead of 35 to 70 we have 35 to 71. One is too high and the other is too low. Errors in both directions are seen all the way around.
Here are similar pictures for the "1 to 3" and "1 to 5" alignments:
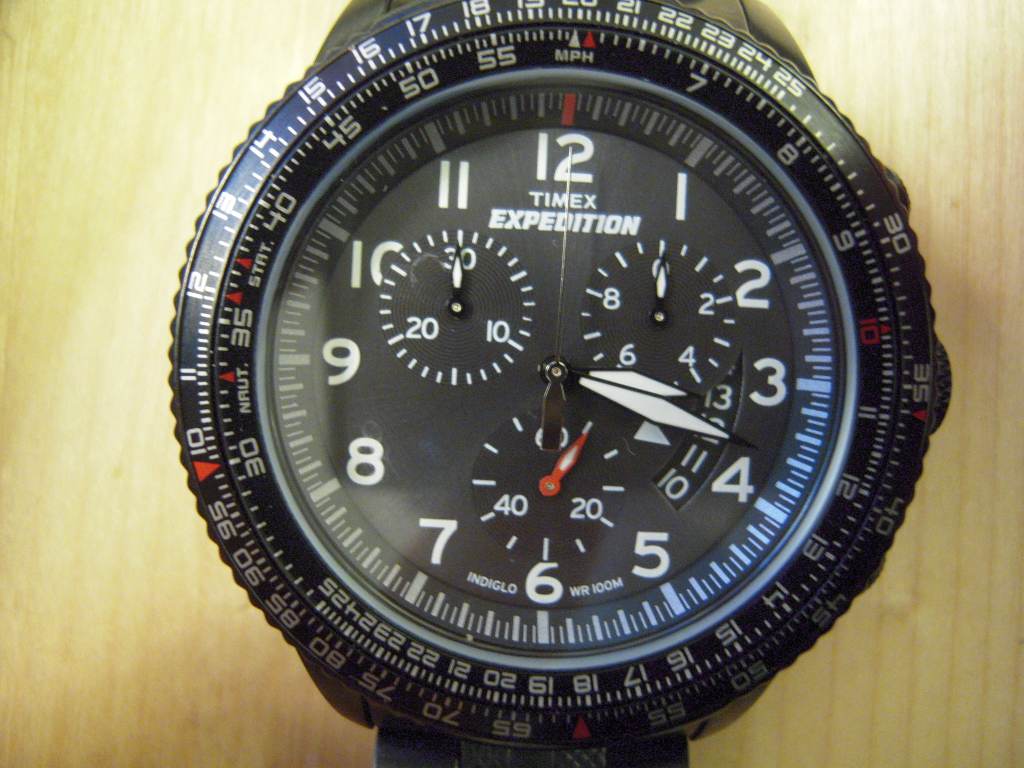
The T49825 aligned 1:3
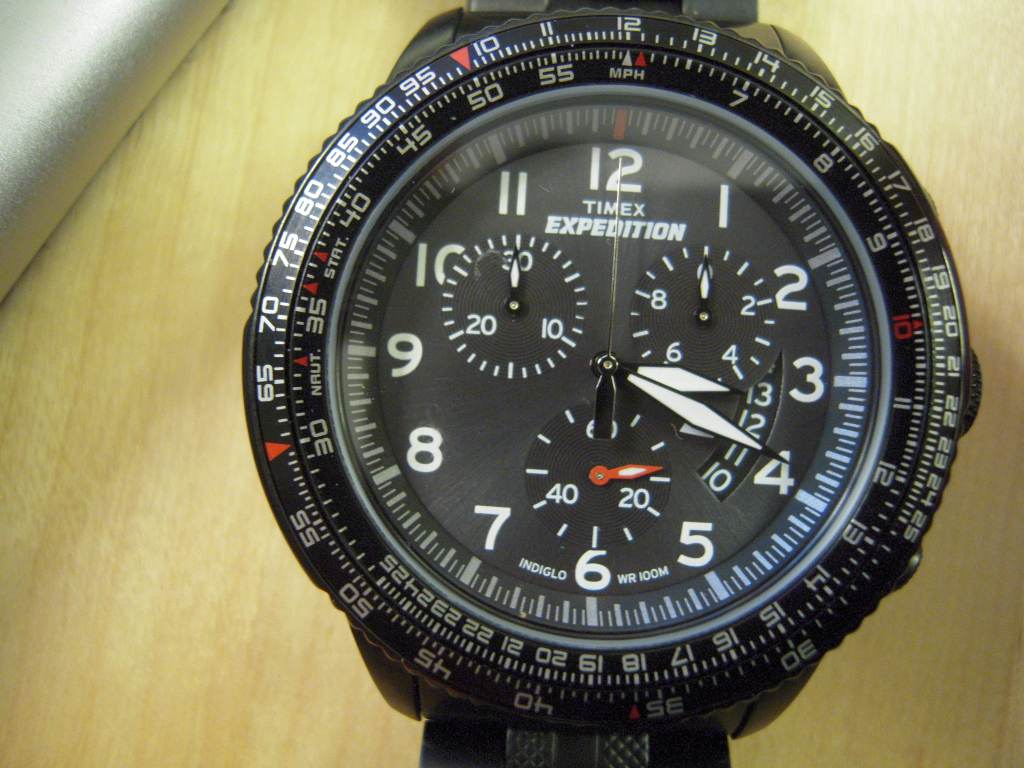
The T49825 aligned 1:5
Typical errors you'll get from this watch are about 1%. The velocity example shown above can be seen to be a bit off.
I tried a few more real problems, counting the beats-per-minute of music by using the stopwatch to count 10 measures or 100 beats of music, then using the slide rule to figure out the beats/measures per minute or per hour. (For example, count out 100 beats, stopwatch ways 24.6 seconds. Align 100 (outer) with 24.6 (inner). Next to 60 (inner) read 244 beats per minute (real answer 243.9). Next to 3600 (inner) read 14600 beats per hour (real answer 14634).) In similar problems I got answers that were off by about 1% or less.
The worst example I could find is when you align 80 (outer) to 40 (inner) to solve the "rule of 3" problem 80/40 = 16/x. The watch gives x=8.2, which is 2.5% high. Here are a few other pretty bad cases:
- Solving 80/16 = 40/x gives x=8.2 (2.5% high; this is the same worst-case in reverse)
- Solving 10/15 = 60/x gives x=91.5 (1.7% high)
- Solving 12/3 = 40/x gives x=10.15 (1.5% high)
I looked for the biggest errors in the "too high" direction; all of these problems could be turned into an equivalent problem which would give an error "too low" by the same amount. Just move the x to the other denominator. The first example was "80/40 = 16/x"; if instead we solve "80/x=16/8" on the watch, we get x=39, which is 2.5% low.
Fortunately, if I am actually out somewhere doing a speed or rate calculation and this watch is all I have available, I probably won't be too concerned about an error of 1 or 2 percent.
Sources
Art Simon's pages on slide rule watches provided most of the details about Breitling's history. I found a circa-1960 Breitling Navitimer manual here (Chuck Maddox), but I still had to figure out some of the details myself. There is also a nice tutorial here (Dave Gauer) with links to all the watch company websites.
This page was written in the "embarrassingly readable" markup language RHTF, and was last updated on 2022 Mar 28.
 s.30
s.30